Hey everyone,
I am trying to get in a school, and I needed a portfolio. So my mom told me to write a short story. It was actually quite fun. So I decided to try and change my blog into a short stories collection, (most of them written by me, but an occasional one written by someone else; I will state their name to give them credit.), My first one will be posted soon.
Carl out...
Monday, March 14, 2011

Thursday, March 10, 2011
DARE me... Come on, I dare you.
Hey everyone,
Howzit going with you guys.
Well, anywhoo...
I've decided, (for fun), to accept reasonable dares, (so no jumping into a fire and no poledancing!), I mean, I might go Bungy jumping, (if my mom lets me),
SO. Go ahead and dare me.
Howzit going with you guys.
Well, anywhoo...
I've decided, (for fun), to accept reasonable dares, (so no jumping into a fire and no poledancing!), I mean, I might go Bungy jumping, (if my mom lets me),
SO. Go ahead and dare me.
Wednesday, March 2, 2011
Sunday, February 6, 2011
How to turn a person into a zombie!!!!!!!!!!!!
Ok, first of all, this post contains blood and freakishness. So for sensitive viewers DON'T LOOK!!!!!!
 Things you're gonna need: picture of your selected persons head,


 a picture of the skull,
picture of blood,
picture of wound.
First Step: Open up Paint.Net. If you don't have it, it is free to download.
 Second Step: Get a profile pic of your person that you're gonna ZOMBIFY!! I chose Angelina Jolie. And load it.
 Step 3: Load your blood.
 Step 4: Load your wound.
 Step 5: Load your skull.
 Using the "Magic Wand" Tool set the tolerance to about 20% or less and select the white area AROUND the skull and del.

Add a new layer and double click it.
 Set the style to overlay. And you can rename it if you want. I named it "Skull Layer".

Select the skull and paste it on the new layer. Keep the canvas size.
Swap the layers.


Set the tolerance on the magic wand to about 46% and select one area of the skin.
 Go to adjustments and select brightness/contrast. Set the brightness to about -44 and the contrast to about 56

 Select more on the colours toolbox and select a tranparent red. Make it a bit darker using the R section.
Now use a brush and paint over some areas in the mouth. Don't forget to do it on the 3rd layer.
 Do the same thing that you did with the skull with the blood. Copy it.
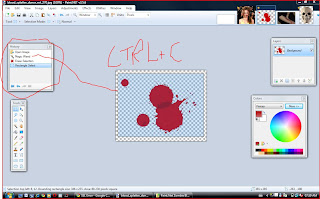 Paste it onto the third layer.
 Lasso select the wound and copy it.
 Paste it onto the 3rd layer and resize it any way you wnt.
 I made the eyes red but you can make them what ever colour you want. Just remember to use the brush and a slightly transparent colour.

 I changed the hue/saturation on the other zombies head.
 And you're basically done. you can edit the other people in the photograph if there are and if you want to.
Here's a Jonas Zombie:
 Enjoy Zombifying people!!!
Oy yeah, I'll be Zombifying any people my followers suggest. So if you want to see someone zombiefied then comment...


picture of blood,
picture of wound.
First Step: Open up Paint.Net. If you don't have it, it is free to download.


Add a new layer and double click it.


Select the skull and paste it on the new layer. Keep the canvas size.
Swap the layers.


Use the eraser tool and erase the area around the mouth.
Create a new layer and set the style to overlay.

Now use a brush and paint over some areas in the mouth. Don't forget to do it on the 3rd layer.


Here's a Jonas Zombie:

Oy yeah, I'll be Zombifying any people my followers suggest. So if you want to see someone zombiefied then comment...
Tuesday, February 1, 2011
Wednesday, December 1, 2010


Dorodango
Hey everyone,
I discovered some awesome new thing on Mythbusters today. It's called Dorodango!
It is basically shiny mud balls. I'm inserting some pictures of them, also instructions and the urls for 2 websites that show you how to do it.
So basically Dorodango is how you use some mud and water and you make it into a sphere and polish it until it becomes shiny. Of course there is a lot more to it than that. But still, thats it basically.
URL's:
http://www.dorodango.com/create.html
http://www.kyokyo-u.ac.jp/youkyou/4/english4.htm
Instructions
Step 1: Create the Mud
In a clean container, add water to the dirt. The ratio of water to dirt will vary depending on the type of dirt. Start by adding a small amount of water, mix, and slowly add more water until the mud reaches an even consistency, similar to dough.
Step 2: Create the Core:
Grab a handful of mud and begin to shape it into a sphere with both hands, squeeze out as much water as you can. Eliminate irregularities from the mass by gently shaking it. The vibration removes voids, increases surface moisture, and facilitates compaction. As you shape/shake the mud, clayey particles will migrate to the surface, forming a slip layer that will make it easier to smooth the mass into a sphere. Proceed to Step 3 when the ball becomes tacky to the touch.
Step 3: Create Preliminary Capsule
Holding the ball in one hand, grab handfuls of dirt with the other and sprinkle the dirt over the ball. With your thumb, gently sweep the excess off, rotating the ball as you do so. Use the outer curvature of your thumb, near the base, to do this. Fumio Kayo has a great video that demonstrates this technique. The newly added dirt will absorb the surface moisture very quickly. Work the ball to point where it retains its shape but isn't so dry that cracks begin to form.
Step 4: Draw the Moisture Out
Insert the ball into a plastic bag. At first, you will only need to do this for 20 minutes or so. Be careful to lay the ball on something soft to prevent a flat area from forming. Water will condense on the inside of the bag and the surface of the ball will become wet again. Remove the ball and repeat Step 3. Return the ball to the bag before cracks begin to appear.
Repeat steps 3 and 4 until the ball begins to feel leather-hard to the touch. You will find that it takes longer for water to condense on the inside of the bag - you can accelerate the process at this point by putting the bag and dorodango in the refrigerator. Note: This will cause the water to condense very quickly, be careful to remove it before too much water condenses out - it will dissolve the ball where it gathers at the bottom of the bag.
Step 5: Create Final Capsule Layer
The brilliant shine of the dorodango is created by applying a final layer of extremely fine particles of dirt. I use two different methods to do this:
On-Site - When you have unlimited access to the dirt that you're working with, simply pat the dry dirt lightly with your hand. Gently rub the fine particles that stick to your hand over the ball.
Off-Site - When you have limited access to the dirt you're working with, screen the dirt into a plastic container with a lid - a regular window screen works fine. Place the lid on the container and shake. Note: If the lid of the container doesn't seal completely, be sure to wear a dust mask. Wait a few minutes for the dust to settle. Remove the lid; there should be an abundance of very fine dust sticking to the sides. Rub the dust into the ball.
Continue this process until the surface moisture of the ball has been completely absorbed (it looks and feels powdery). Insert the ball into a new plastic bag. Repeat this step as many times as possible to create a thick capsule. When the fine particles no longer adhere to the surface of the ball after you take it out of the bag, you're ready to begin polishing.
Step 6: Polishing
Remove the ball from the bag and let it dry for 20 minutes. Polish with a soft cloth - carefully at first - if any moisture is present, the cloth will mar the surface. Polish or buff more vigorously once the ball is dry.
I discovered some awesome new thing on Mythbusters today. It's called Dorodango!
It is basically shiny mud balls. I'm inserting some pictures of them, also instructions and the urls for 2 websites that show you how to do it.
So basically Dorodango is how you use some mud and water and you make it into a sphere and polish it until it becomes shiny. Of course there is a lot more to it than that. But still, thats it basically.
URL's:
http://www.dorodango.com/create.html
http://www.kyokyo-u.ac.jp/youkyou/4/english4.htm
Instructions
Step 1: Create the Mud
In a clean container, add water to the dirt. The ratio of water to dirt will vary depending on the type of dirt. Start by adding a small amount of water, mix, and slowly add more water until the mud reaches an even consistency, similar to dough.
Step 2: Create the Core:
Grab a handful of mud and begin to shape it into a sphere with both hands, squeeze out as much water as you can. Eliminate irregularities from the mass by gently shaking it. The vibration removes voids, increases surface moisture, and facilitates compaction. As you shape/shake the mud, clayey particles will migrate to the surface, forming a slip layer that will make it easier to smooth the mass into a sphere. Proceed to Step 3 when the ball becomes tacky to the touch.
Step 3: Create Preliminary Capsule
Holding the ball in one hand, grab handfuls of dirt with the other and sprinkle the dirt over the ball. With your thumb, gently sweep the excess off, rotating the ball as you do so. Use the outer curvature of your thumb, near the base, to do this. Fumio Kayo has a great video that demonstrates this technique. The newly added dirt will absorb the surface moisture very quickly. Work the ball to point where it retains its shape but isn't so dry that cracks begin to form.
Step 4: Draw the Moisture Out
Insert the ball into a plastic bag. At first, you will only need to do this for 20 minutes or so. Be careful to lay the ball on something soft to prevent a flat area from forming. Water will condense on the inside of the bag and the surface of the ball will become wet again. Remove the ball and repeat Step 3. Return the ball to the bag before cracks begin to appear.
Repeat steps 3 and 4 until the ball begins to feel leather-hard to the touch. You will find that it takes longer for water to condense on the inside of the bag - you can accelerate the process at this point by putting the bag and dorodango in the refrigerator. Note: This will cause the water to condense very quickly, be careful to remove it before too much water condenses out - it will dissolve the ball where it gathers at the bottom of the bag.
Step 5: Create Final Capsule Layer
The brilliant shine of the dorodango is created by applying a final layer of extremely fine particles of dirt. I use two different methods to do this:
On-Site - When you have unlimited access to the dirt that you're working with, simply pat the dry dirt lightly with your hand. Gently rub the fine particles that stick to your hand over the ball.
Off-Site - When you have limited access to the dirt you're working with, screen the dirt into a plastic container with a lid - a regular window screen works fine. Place the lid on the container and shake. Note: If the lid of the container doesn't seal completely, be sure to wear a dust mask. Wait a few minutes for the dust to settle. Remove the lid; there should be an abundance of very fine dust sticking to the sides. Rub the dust into the ball.
Continue this process until the surface moisture of the ball has been completely absorbed (it looks and feels powdery). Insert the ball into a new plastic bag. Repeat this step as many times as possible to create a thick capsule. When the fine particles no longer adhere to the surface of the ball after you take it out of the bag, you're ready to begin polishing.
Step 6: Polishing
Remove the ball from the bag and let it dry for 20 minutes. Polish with a soft cloth - carefully at first - if any moisture is present, the cloth will mar the surface. Polish or buff more vigorously once the ball is dry.
Subscribe to:
Posts (Atom)